Thursday, January 3, 2013

A PLACE OF ONE'S OWN....


Thank you everyone, for making my 2012 a perfectly fun year. It will be a year next month since I started on this journey and I have had more fun sharing my little Cottage and the goings on in my life with all of you.

Thank you to all who follow me and to those that just stop by for a short visit now and then. I appreciate you all.  I am so happy to see all your beautiful homes and projects and the wonderful ideas that I always get from you. Of course, The Captain isn't any too thrilled because it always entails another job for him. But, I do have to say in his defense, that he usually does them with a smile!  So as 'usually' is the operative word here, let's get on with it!


"A room where one sleeps and dreams and grieves and rejoices becomes inseparably connected with those processes and acquires a personality of its own.  This room is not a pretty or dainty one, but it has always been a retreat for me, the one spot in Belmont where I might be alone and possess my soul in quietness"...So wrote Lucy Maude Montgomery, author of Anne of Green Gables, in her journal.
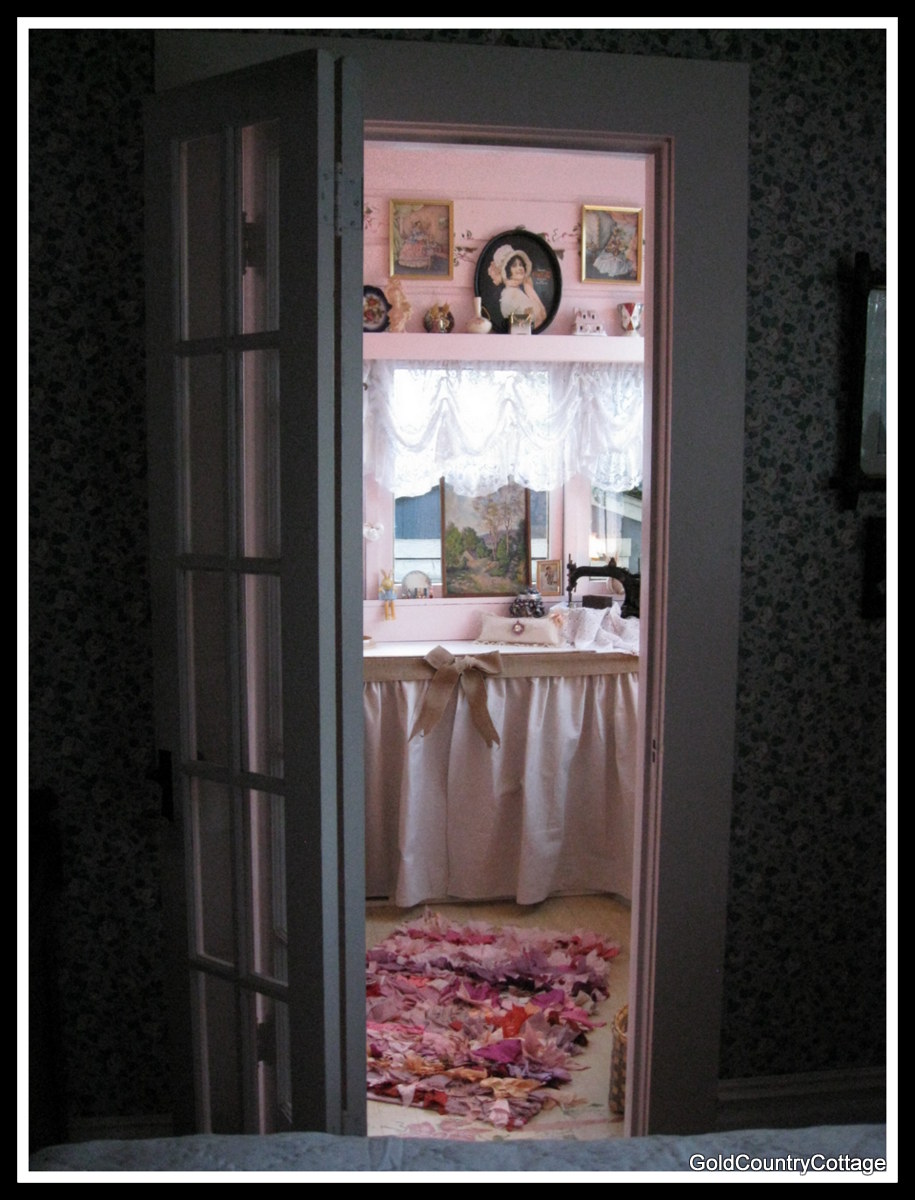


Tucked back in a corner of the Cottage, just outside the guest bedroom, is a very tiny room which, from now on, will be referred to as The Snuggery, but before I tell you about this inviting spot, let me say that I've seen so many wonderful craft and project rooms through blogging, and I truly admire them all.  I used to have, in another life, a room such as those.  Lots of paint bottles, patterns, greenware and scraps of fabric and wood lined the shelves.  I even had a drafting table and a jig saw, but in this life I am content to shop for other people's crafts and when I do work on a project you most likely will find me at the kitchen table or in front of the fire.  This little room was not designed to be a hard core craft room and, I feel so fortunate now to be able to take the time to enjoy the solitude and quiet that this little place of peace provides for me.


This tiny room, I'm sure, started life as the outside of the Cottage.  Sometime over the course of the years, it was enclosed and by adding a few windows, it was turned into a sunporch.  When we aquired the Cottage it had ugly, dark green, rubber tiles on the floor and the walls were marked and yellowed.  We stripped them off and painted and stenciled them.  I came across the ribbon rag rug in Ross's and since it had the perfect colors, bought it.  I am finding that I'm having to glue some of the rags that keep falling out, but for $11 I think it will last long enough.


"And inside there was the most charming little snuggery imaginable".

Mrs. Molesworth, "The Cuckoo Clock", 1877


Starting from the left side as you enter stands my grandmother's maple hutch that she had in her dining room for as long as I can remember.  I painted it a few years ago, and it is now a place where family pictures, wrapping paper and some Christmas decorations are kept.


The Captain helped a friend move and was given this small table.  I painted it and now it is handy for a lamp and a few magazines in the drop down front.  The lamp is from Home Depot, which I painted, and the shade from K-Mart, embellished with a flower jewel picked up at Hobby Lobby.


In this corner sits one of a pair of chairs that we picked up many years ago at a yard sale.  You may recognize it as a twin to the chair in the library. I ordered two slip covers from Sure Fit.  They were originally gold with pink flowers.  The one in the library was dyed with Rit dye in Denim.  This one was dyed burgandy.  The flowers didn't change much but the backgrounds did.  A pillow that was purchased at the annual holiday sale in town and Little Butterscotch Bunny, snuggling in the corner, along with a pretty throw, keep a body warm while watching out the windows for the first snow fall.  This is the only room in the Cottage that doesn't have a huge attic space over top, so it provides beautiful music from the rain.


The workbench consists of three sets of Ikea cabinets that we got from a hairdresser who was closing up her shop.  The Captain attached a top and I made the skirt out of a drop cloth after we removed the doors of the cabinets.


"Well, this is a cute little snuggery and no mistake".

Robert Smythe Hichens, "The Way of Ambition", 1912


Meet Mabel.  She is an antique dress form that is wearing a blue and white apron that I already had.  I put it in the washer with a whole lot of bleach and it turned the blue to the exact shade of lavender-pink to match the rest of the decor.  The reason she goes by the name of Mabel, is because that was my grandmother's name and I have her brooch that spells it out.  It is pinned to the hanky on the apron pocket.


Here is the desk that we picked up at a yard sale.  I showed it to you awhile back in it's original sorry state.  I painted it with plain latex white paint and used AS dark wax over all.  I did not remove the hardware before I painted.  It is quite typical of the period of the desk and, in my opinion, a little bit ugly, as was the desk.  Now I am happy with the way it looks and is a perfect place for storage and for my sewing machine.


"It was decorated with those pretty little knickknacks so dear to the heart of a girl in a snuggery she can call her own."

Robert Barr, "In the Midst of Alarms", 1894


This was my great-grandmother's Wheeler-Wilson sewing machine.  I believe it to be circa 1876.


Well, that is the story of my Snuggery.

It is a room just big enough to while away the time with a cup of tea and a good book or a simple dream.

 Whatever the case, it is all mine to enjoy...

Judy


"The room in which we took tea was a veritable snuggery."

Robert Grant, "A Romantic Young Lady", 1886


The tea set is from HomeGoods.  The book, Granny Chic by Tiff Fussell and Rachelle Blondel, is a gift to me from one of my dear friends, Anne at Marmalade and Catmint. Thank you, Anne, for this charming little book. It's jammy packed with delightful projects and inspirations for the handmade home and I am thoroughly enjoying it.


I am joining these wonderful parties today:


Sunday, December 30, 2012

HAPPY NEW YEAR WISHES


We hope that you all had a wonderful Christmas filled with laughter and love
in the presence of family...


...and we wish that you will enjoy a new year filled with hope,
happiness and good health.


The Captain and Judy
Buddy and Maggie


And the rest of the gang at...

Gold Country Cottage

CELEBRATE

HAPPY NEW YEAR


Sunday, December 23, 2012

MERRY CHRISTMAS EVERYONE...


"And I Heard Him Exclaim,
As He Drove Out Of Sight...


...Merry Christmas To All
And
To All A Good Night."


Happy Holidays,

All Of Us At..

Gold Country Cottage


Friday, December 21, 2012

THE BEGINNING OF THE END


"From home to home,
And heart to heart,
From one place to another,
The warmth and joy of Christmas
Brings us closer to each other."

Emily Matthews


We have almost reached the end of our Christmas story for this year.


Before we close the book, I will show you a project that we've been working on for awhile.  It's far from finished yet.  There is more painting to do and more decorating, but I thought you wouldn't mind sharing some of the work in progress.


This is our guest bedroom, as it stands now, with a little bit of Christmas cheer.


The wallpaper will remain the same.  We have completed the painting of the trim.  The linens are new, purchased at Target.  I think they will be better suited for spring and summer though, so I have another spread and quilt that will take up residence in the cold months to come.  The pillows are from Ross and some thrift sales.


I plan to paint the dressers.  We have had them for many years and I think a fresh coat of paint will be just the ticket to brighten up the room.  A new change for a new year.


I bought a little marble top washstand from my sister to be used as the bedside table and will be picking that up shortly.


Pictures, may or may not, be changed and rehung, and some accessories will be added.


~~~~~~~~~~~~~~~~~~~~~~~~~~~~~~~


Now to end our Christmas story, we must start at the beginning.  The first thing you see when arriving at the Cottage...the front porch.


...and the last thing you see when leaving...


~~~~~~~~~~~~~~~~~~~~~~~~~~~~~~


I hope you enjoyed our yuletide cottage...and accept our warmest wishes for a very happy holiday with your families and friends as I leave you with these final thoughts...


"Peace and goodwill in each loving home,
Beauty and magic so surely you own.
Sweet Christmas angels - moments of love,
Part of the wonder God sends from above."

Garnett Ann Schultz


Merry Christmas...Judy


I'm sharing this story with:


Tuesday, December 18, 2012

LITTLE CHRISTMAS CHARMINGS..A TUTORIAL IN 12 EASY STEPS


I have been seeing so many pretty projects during this holiday season and I have wanted to try my hand at all of them, but, alas, there are not enough days left to take advantage of this Christmas season.

I have, however, taken a chance at making a wreath that I saw on Courtney's blog, French Country Cottage, and even though it is a much smaller version of the one she did, I am still quite proud that it came from my limited knowledge of producing something that I would take the liberty of showing to the world, so to speak.

Now, if you like it, there may not be enough time for you to put it to the test with your busy schedules around this time of year, but it is also one that can wait until a quieter time.  Either way, here it is in twelve easy steps.

You've already seen the original in the picture above.  You need to go right down to your Dollar Store and buy one of those gold sparkly ones, or not.  There are many different colors to choose from.  Not too bad in it's original form, but just you wait!

Step One:  Stay at the Dollar Store, or whatever store you choose, and buy some yarn in your choice of color and type.

Step Two:  Now here is where it gets a little dicey.  If you have not been lucky enough to achieve a college degree, this project may not be for you.  It encompasses some very strong language.  For example, phoosh, phish, and, or not, are used quite often.  I suppose you could look those up in the dictionary but that would take valuable time away from the project.

Step Three:   First you will want to trim the gold sparkly stuff off of the wreath form, or not.  I did, but you could leave it and let some show through.  My personal preferance was to cut it off.  You won't be able to get it all off, however, but don't worry it will not affect the outcome of the finished project.


Step Four:  Cut a piece of cardboard to about 4 inches by 2 inches, or not.  Remember the bigger the cardboard, the bigger the phoosed yarn will be.


Step Five:  Take tail of yarn and lay it across cardboard and put your thumb over yarn to hold it in place, or not.  Thumb may be placed there so that you don't pull the yarn too tightly and then not be able to slip it off the cardboard after winding.

Step Six:  Wind the yarn 50 times around the card, or not.  Again, it will depend on how big you want your phoosed yarn.  It seems like it takes such a long time to sit there and wind it 50 times, so what I usually do is wind it 25 times, then as I continue to wind, I will start back at one again and count 25 more times.  That way it only takes about half as long.....Huh?


Step Seven:  After you have wound your yarn totally around the cardboard, cut from skein and slip it off, keeping it all together...  or not, will NOT work here.  Cut a piece of yarn about 10 or 11 inches long, or not.  It just depends how ambidextrious you are with your hands.  If you can tie a not, I mean a knot, with a shorter piece of yarn than you can do that. It might help if you got yourself a better manicure!


Step Eight:  Lay the piece of yarn across your legs, being sure to keep your knees together. Well, we are all ladies, so we say, so that should be a given, right?  Lay the yarn across the cut piece, as shown and tie tightly into a double knot.


Step Nine:  After you have tied off the yarn, you will have something similar to a figure eight.  Cut each end of the 'eight' through the middle and phoof through the yarn with the end of the scissors or fingers to make sure all loops are cut.  Then cut through the other side the same way.  Hold yarn by the long tails and phoof up with your fingers.


Step Ten:  Take yarn in your hand and fist it together.  Trim with scissors, using your fist as a guide.  Do not trim the piece of yarn used to tie.  You will do this later. Also, there is no need to trim your fist, I'm just saying!   


Step Eleven:  After first cutting, hold yarn like a flower and phoof a small amount of yarn in the center and trim it the same.


Step Twelve:  Lay yarn 'flower' on front of wire frame and let two longer pieces lay towards the back of frame.  Holding 'flower' in place turn frame over and tie off, tightly, the two long strands.  Trim strands at this time.  Turn frame over and phoof yarn to look pretty and poofed.  Continue this around the whole frame. It takes about 14 or 15 'flowers' to fill a frame of this size.

When finished add ribbon and ornament of your choice and there you have it!

You can actually use any type of frame that you want.  I have seen styrofoam, cardboard or grapevines.  I actually "heard" of a woman who thought she could save money by cutting a cardboard form.  She reportedly used a pair of shears that she had used to cut the stems of her greens.  I "heard" she was doing this early one morning while still in her jammies. She leaned over a little to closely as she was cutting the cardboard and the handles came into contact with her chestal area, if you know what I mean.  It really smarted, so I "heard".  I don't recommend using this procedure.  Or Not!


Hopefully you got through this scientific experimental project and if anyone asks you "how is that college degree working for you?" You can say it might not get you a job in this day and age, but it sure can help you make one sweet little wreath!


Three little Christmas charmings, and counting...Judy

I'm sharing this with:


A MOMENT OF SILENCE AND SUPPORT